Connecting R and arduino wirelessly through websockets
In the last post, I demonstrated how to send data from arduino to R through serial connection. This time, I’m going to talk about how to connect R and arduino through wireless websocket connection. Trust me, it’s not as hard as it sounds like.
Hardware requirements
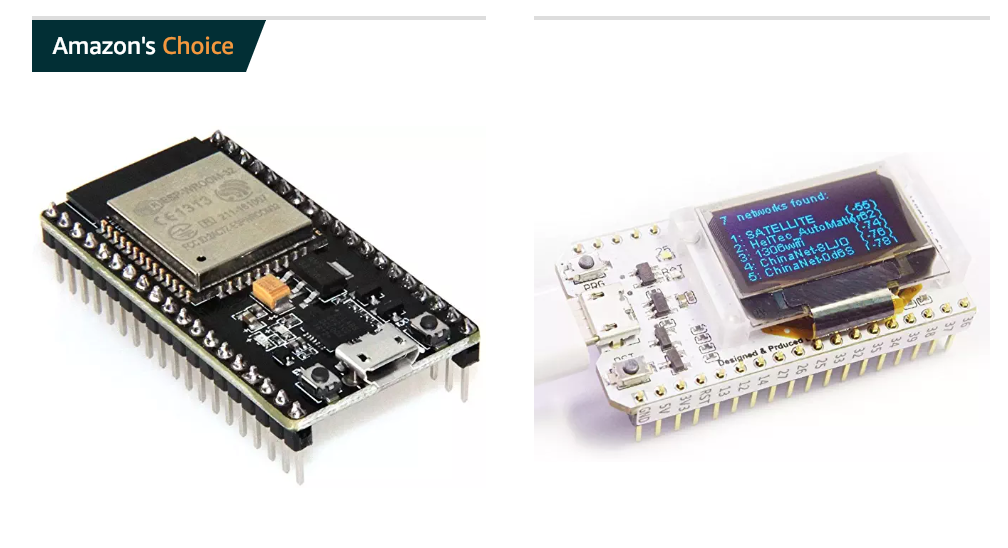
Obviously, you need an arduino board that can connect to the Internet. Today, the most popular boards of this kind includes ESP8266 or ESP32. These two chips come with a built-in WiFi kit (the ESP32 board even has a bluetooth module). Also, thanks to their popularity, there are plenty community-based libraries developed to easily utilize these hardware.
If you are in the US, you can get a development ESP32 board on Amazon for ~$11. You can even think about getting one with a small LED screen, which can tell you the IP addresses when you go wireless.
In this example, I’m using the ESP8266 chip which I used in the previous example.
Websocket 101
- Our typical HTTP based internet is unidirectional. You sent out a request to the server and the server sends back a response. If you don’t request, you won’t get anything.
- For websocket, the communication is more like human communication and is bidirectional - once the connection has been setup, both you and the server can send and receive information at any time.
- Websocket is also based on TCP, which means that it makes sure the messages you/server receive are “in-order”.
- Websocket also has the term server & client. The server has the capacity to receive connections from multiple clients. It can send out information to certain client or boardcast the information to everyone that’s connect.
Setup Websocket server on ESP8266
This code example below only demonstrates how to setup a websocket server for ESP8266. For ESP32 or other boards, you probably need to load different packages and the setup might be slightly different.
Basically here you are trying to do 2 things:
- You want to connect your chip to a WiFi
- You want to start a websocket server
In order to connect to WiFi, I’m using the ESP8266WiFI, WiFiClient and the ESP8266WiFiMulti library. The ESP8266WiFiMulti library here allows you to save multiple WiFi credentials in your code. For security concerns, please make sure not to lose your arduino device after you do this.
To setup a websocket server, we are using this arduinoWebSockets library. You can find a bunch of examples for a number of different devices in the examples folder. In fact, I learned how to get it work on my ESP8266 following one example over there.
#include <ESP8266WiFi.h>
#include <ESP8266WiFiMulti.h>
#include <WiFiClient.h>
#include <WebSocketsServer.h>

// Put in your WiFi credentials here
const char* ssid = "Your Wifi 1";
const char* ssid2 = "Your Wifi 2"; const char* password2 = "Wifi pw 2";
const char* ssid3 = "Your Wifi 3"; const char* password3 = "Wifi pw 3";

ESP8266WiFiMulti wifiMulti;
int16_t randomNumber1, randomNumber2;
char outtxt[50];
const int16_t wsPort = 81;
WebSocketsServer ws = WebSocketsServer(wsPort);


void setup(void){
 Serial.begin(115200);

 wifiMulti.addAP(ssid, NULL);
 wifiMulti.addAP(ssid2, password2);
 wifiMulti.addAP(ssid3, password3);
 while (wifiMulti.run() != WL_CONNECTED) {
    delay(500);
    Serial.print(".");
 }
 Serial.println("");
 Serial.print("Connected to "); Serial.println(WiFi.SSID());
 Serial.print("ws://"); Serial.print(WiFi.localIP());
 Serial.print(":"); Serial.println(wsPort);

 // Setup webSocket server
 ws.begin();
 ws.onEvent(webSocketEvent);
 Serial.println("webSocket server started!");
}

void loop(void){
  randomNumber1 = random(100);
  randomNumber2 = random(100);
  sprintf(outtxt, "%d,%d", randomNumber1, randomNumber2);
  ws.loop();
  ws.broadcastTXT(outtxt);
  delay(100);
}

void webSocketEvent(uint8_t num, WStype_t type, uint8_t * payload, size_t length) {
    switch(type) {
        case WStype_DISCONNECTED: Serial.printf("[%u] Disconnected!\n", num);
            break;
        case WStype_CONNECTED:
            {
                IPAddress ip = ws.remoteIP(num);
                Serial.printf("[%u] Connected from %d.%d.%d.%d url: %s\n", num, ip[0], ip[1], ip[2], ip[3], payload);
                ws.sendTXT(num, "Connected");
            }
            break;
        case WStype_TEXT:
            Serial.printf("[%u] get Text: %s\n", num, payload);
            break;
        case WStype_BIN:
            Serial.printf("[%u] get binary length: %u\n", num, length);
            break;
    }
}
After you compile the script and upload it to your chip, you should be able to see something like this:

Connecting R to the websocket server
Now we have a running websocket server boardcasting in our Wifi network. We need to create a websocket client in R. RStudio is working on a websocket package but is a little pre-matured at this stage. On the other hand, webrockets, which is a rOpenSci 2017 unconference project has all the features we need for now. However, it seems like it can’t be built on Windows . (Windows User: ??? Again?! 😭😭😭)
For now, let’s pretend all makers are using Mac or Linux (well, clearly that’s not true :P) and use webrockets as our dependencies. In the future, once rstudio’s websocket project gets on the road, let’s think about switching to that.
Okay, enough explaining. Let’s see how to use it in R.
library(arduinor)

con <- ar_ws_init("ws://192.168.xxx.xxx:81")
ar_ws_plotter(con)
Now, you get the same interface as your serial plotter! I hope this is not too easy. :P

Note that the default reading frequency here is 20Hz (50ms). If your frequency is too high, it might clog R session.
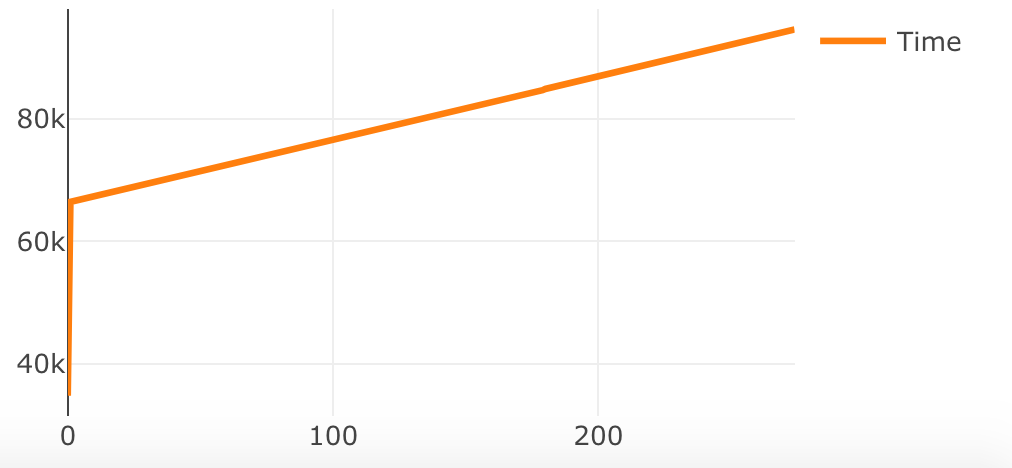
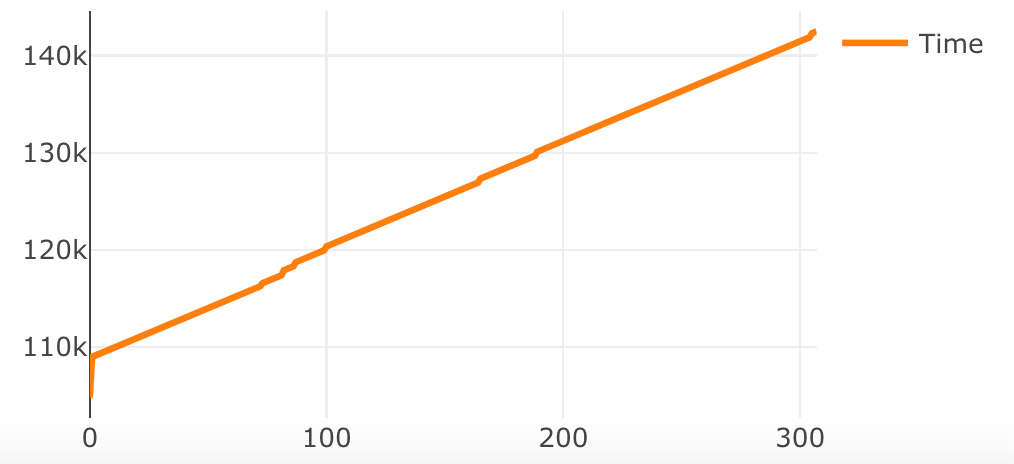
Good WiFi v.s. Bad WiFi
If you have a crappy Wifi router, you might experience some package loss. One way to examine that is to let your arduino log its time. Below you can see a comparison between the private hotspot hosted by my cellphone and a guest network I found in the public space.